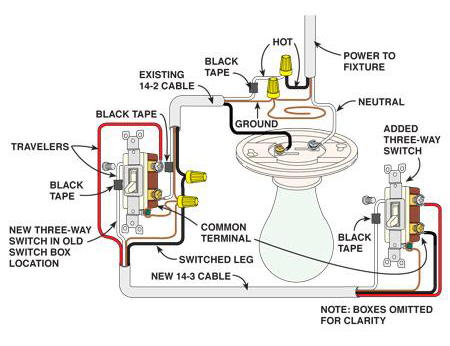
Installing and wiring a light fixture is not a very difficult task, but does need to be approached with a degree of caution. Electricity is involved and if you allow it to it can give a nasty shock to the careless worker. Never take chances around electricity.
The first step is always to turn off the current. Turn the light on and find the correct circuit breaker in your breaker panel. If necessary turn them off one at a time until the light goes out. Do not depend on the light switch to turn off the power to the light; someone else could turn it back on, especially if it is only one of two or more switches controlling the same light fixture. If you absolutely must leave the circuit breaker on turn off the switch and tape it into the off position with a piece of masking or electrical tape. Repeat for all the switches that might control that particular light fixture. It is not as safe as turning off the breaker, but hopefully it won’t be accidentally bumped on and anyone trying to turn it on will at least pause and ask before doing so. As a professional electrician I not only turn off all power but check with a voltage tester to make absolutely sure there is no current at the light.
Tools For Installing and Wiring a Light Fixture
There are only a few tools and supplies necessary for the task as follows:
- Screwdrivers. Either or both a flat tip and a Philips tip screwdriver may be needed – older screws in an existing fixture often need a flat tip, while newer screws are usually a Philips tip.
- Wire strippers. If a new installation wire strippers will be needed. If you are replacing an existing fixture the wires should be already stripped.
- Pliers. Pliers may be needed to tighten supporting nuts on the light fixture
- Wire nuts. Probably supplied with the new fixture, but if not a few wire nuts will be needed.
- While not absolutely necessary, a non contact voltage detector is an inexpensive method of maintaining your safety. A nasty shock in the middle of the job isn’t pleasant.
All of these tools should be in a homeowner tool set; but if not it would be a good time to start or finish your own tool set.
Remove the Old Light Fixture and Prepare Wires
Any old fixture already installed must be removed before installing a new light fixture. Remove any glass globes and light bulbs as necessary; you won’t want them falling off during the process. Most light fixtures are attached with two screws but some use a large nut to hold the fixture to the ceiling. Loosen and remove the screws or nut as appropriate and gently lower the fixture as far as possible. If there is a mounting bracket attached to the electrical ceiling box, remove and discard it.
Now is a good time to check for voltage with a non contact voltage tester if one is available, before proceeding with the removal. Older houses will occasionally have wiring that is not color coded or is too darkened to readily determine the wire colors – if this is the case make careful note of which house wire is connected to the black and white wires in the light fixture and mark them with a piece of tape for future reference. Remove the wire nuts connecting the house wiring to the light fixture and replace the nuts loosely on the house wiring as a safety precaution. As an elementary safety act, try not to touch the bare wires; yes, current is turned off but a good electrical safety practice is not to touch any wire that could carry current whether turned off or not. Far too many people have been shocked by wires they thought were off, don’t let it happen to you.
If the new light fixture is smaller than the old one and will leave an unpainted area of the ceiling visible it would be a good time to apply a little paint. Most house paints will dry in only a few minutes and doing the painting without a new light fixture in the way will be much easier.
CALL US NOW :
(323) 609-8250
or
LEAVE US A MESSAGE AND WE WILL GET BACK TO YOU SHORTLY